A costume contest for pets got me thinking about what Halloween costumes for dogs might be available. I also needed coordinating costumes as my dogs, Chip, Tory and Arwen, would all be participating.
And, rather than buying something ready-made, I wanted to make the costumes myself.
Come along with me to learn about my thought process, what supplies I bought, and how I made the costumes.
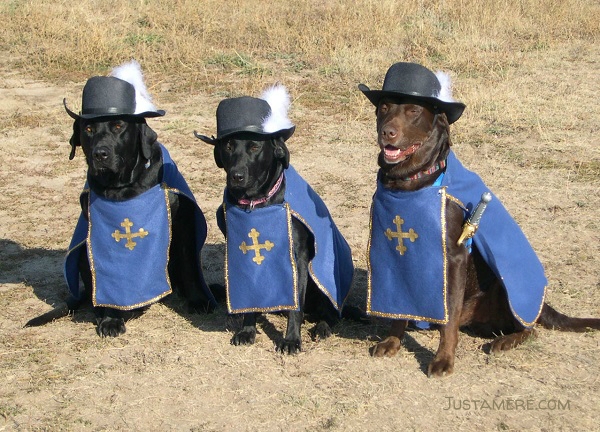
The 3 Musketeers started it all
All for one, one for all!
Designing the costumes was interesting because they had to be instantly recognizable, but my dogs also had to walk in them. After a quick Google image search, I decided on hats with feather plumes and the signature musketeer tunic. I also bought plastic swords for all of them, but could only convince one dog that they weren't chew toys.
I started by measuring each dog from just below their collar to just above their front feet. Then I measured in back from just below their collar to the base of their tail. I also measured across their chests, from the outside of one leg to the outside of the other leg. And finally I measured across their chest and shoulders and back around to the front. This measurement, less across the chest, gave me the top of the cape measurement. (Just in case, I added 2 inches.)
Next was calculating the amount of fabric needed and making a list of supplies.
After cutting out and test fitting, I stitched together the tunic and cape at the top corners. Then I glued gold braid around the edges of the fabric. I saved painting the crosses for last so I didn't risk smearing the paint.
Next I reshaped the hats using moist heat and lots of patience. I attached the white feathers with a couple spots of glue. And finally I added some thin elastic as chin straps to keep the hats on their heads.
Luckily Labs don't mind playing silly games like dress up! They did spectacularly and even won the costume contest at the local Labrador club.
Supplies
- blue felt fabric
- gold braid trim
- gold fabric paint
- 3 black cowboy hats
- 3 fluffy white feathers
- 3 plastic swords
- hot glue gun and glue sticks
Supplies:
- 3 white flat sheets
- 3 plastic jack-o-lanterns
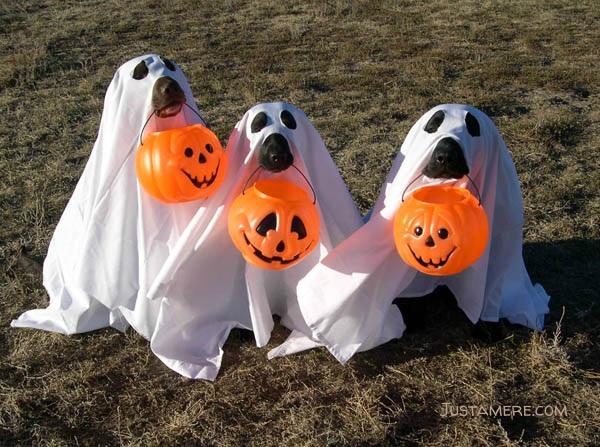
Trick or treating ghosts
What could be more iconic than ghosts on Halloween? Except these ghosts had four legs!
That year was a test of their obedience skills. They had to sit with sheets over their heads and carry plastic jack-o-lantern buckets.
Buying three flat sheets and three jack-o-lanterns was the easy part.
Next came draping a sheet over each dog and determining the best place to cut holes. It took some trial and error - with each dog - to find the perfect place and sizes for the holes. I made sure to start with small holes and test fitted before making the holes bigger.
My dogs were all taught to fetch on command, but it took a bit to convince them that fetch also applied to the thin bucket handles. After all, they were used to retrieving birds or a bumper.
Then they had to learn that I wanted them to sit, with a sheet draped over them, AND hold the bucket. And they had to do it at the same time and for long enough to get pictures.
They did it and got plenty of treats!
Four-legged duck hunters
The next year had to be something simple because I didn't have time to make elaborate costumes for Halloween. So I dug out some hunting clothes - ball caps, camo shirts, duck calls, whistles, etc.
After getting them all dressed, something just didn't look right. Off I went to the nearest thrift store where I found three pairs of kid's pants in tan and green.
Getting all three dogs to wear the hats, shirts, whistles and duck calls was easy. Putting pants on them took a bit more work. =D
When they were dressed and sitting attentively, I took the picture. And just then the shotgun fell over. No, it wasn't loaded, but it got their attention. As they moved, hats fell off, pant cuffs were stepped on and general mayhem ensued.
Good thing that one photo turn out so well!

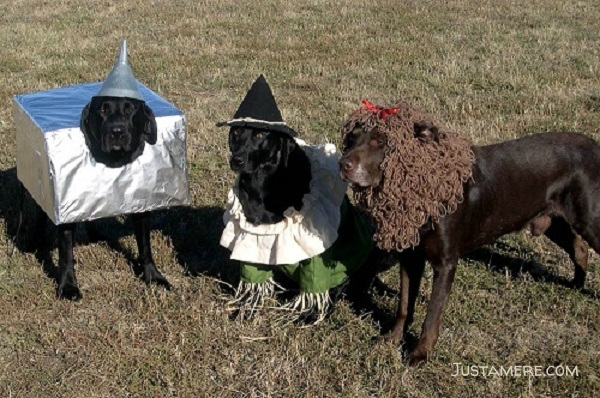
Follow the yellow brick road
As Halloween drew nearer, I was trying to come up with a theme so each dog would have a unique costume but be recognizable as a trio. Pairs are easy, threesomes take more work!
The Tin Man costume
I found a box as long as my dog from chest to tail. Next I taped the flaps to the inside and flipped the box over. Then I cut a large hole with about half on the front and half on the top. The hole should be just big enough for the dog's head to slip through.
I tried painting the box silver, but it didn't look metallic enough. Instead, I covered it in aluminum foil. It looked better, but made a crinkly noise when moved. It took some patience and a few practice sessions before Tory felt comfortable wearing the box.
I used an old metal funnel for the hat. After drilling a couple holes near the top of the funnel, I added some thin elastic to go under his chin.
Good thing he had learned the Stand for Exam obedience exercise!
The Scarecrow costume
Arwen's Scarecrow costume took some sewing and several fittings to come close to fitting her. I started with a shirt pattern, but made the front narrower and the back wider. In hindsight, using a plain green t-shirt would have been easier. For the collar, I stitched a piece of creamy white fabric into a circle and added elastic near the top.
For the hat, I glued black felt into a cone shape. The wide end needed to be about the width of the dog's head. Next I cut a circle that was about 2" wider than the base of the cone. I glued it to the cone and cut out the center portion. Thin black elastic kept the hat in place. I also glued short bits of raffia to the brim.
Just before taking the photo, I tucked some raffia into the sleeves.
The Cowardly Lion costume
What took the longest to make was Chip's lion mane. I took a measurement from about the middle of his forehead to the top of his shoulder blades. Then I cut a piece of stretchy fabric to that length and sewed it into a tube. One end was a snug fit around his head while the other end fit around his shoulders. During the final test fit, I marked around the top of each ear. After removing the tube, I cut holes for his ears.
For the mane, I wrapped yarn around three fingers and tied one end tightly before cutting the bundle loose. I used a whole skein of yarn making these bundles. Then starting at the narrow end of the tube, I sewed each bundle to the stretchy fabric. To finish, I tied the ribbon in a bow and stitched it in place between the ear openings.
I'm not sure if they were starting to enjoy Halloween dress up or if they were just resigned to my shenanigans.
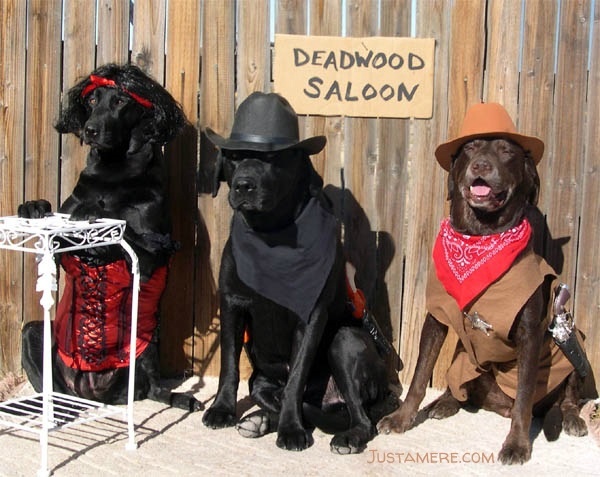
Old west characters
In early October the next year I found myself wandering the Halloween aisle in the local store. I was trying to come up with another trio of costumes. Looking at this and that, I found a red bustier (corset) that was sized for a child. There were also cowboy hats and six guns nearby. Hmmm.
Arwen's costume was pretty easy. Tie some red ribbon in a bow and attach to the wig. Check. Lace her up in the bustier. Check. Add a table prop to help her sit up and show off her costume. Check!
The black-wearing outlaw took a little more work. I added a thin piece of elastic to hold his hat in place. Then cut the black fabric, folded it into a triangle and tied it around his neck. Added his belt and holsters and he was ready.
The sheriff's outfit took a little more work, but not too much. I added a thin piece of elastic to hold his hat in place. Then I cut and sewed the tan fabric into a tunic. The belt with holster held the tunic closed. Finishing touches were the red bandana and the sheriff's badge.
Tory and Chip were perfect in their roles as the outlaw and the sleepy sheriff. Arwen was not pleased though. I don't think she liked having to wear a girly outfit with a wig AND sit up. She would have made a good outlaw, but for this year she was the dance hall gal.
Supplies:
- red bustier
- black wig
- 8" piece of red ribbon
- a black cowboy hat
- a brown cowboy hat
- two sets of six-guns with belts and holsters
- a sheriff's badge
- a red bandana
- fabric pieces in black and tan
Supplies:
- 3 white shirts
- 3 men's ties
- red and yellow fabric paint
- black witch's hat
- 2 pairs of reading glasses
- white chalk
- white paint
- black fabric
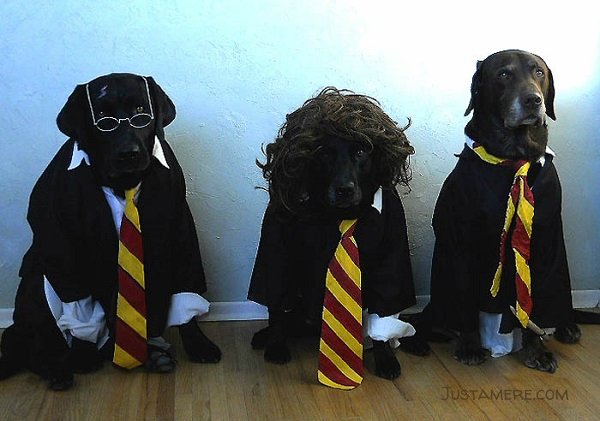
You're a wizard Harry
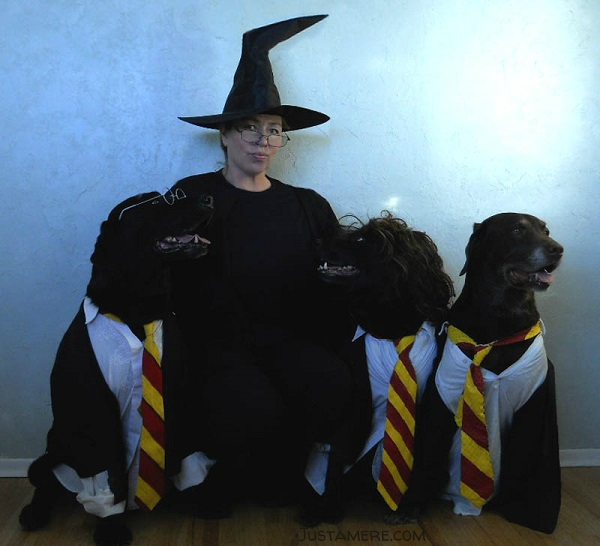
The next year I decided to show them that dressing up isn't all that bad. So I joined them.
Another trio - Harry, Hermione and Ron - plus one - Professor McGonagall.
Starting with the ties, I turned them into Gryffindor ties with SEVERAL coats of the red and yellow paint. Notice how one turned out a bit wrinkly? That was Ron's tie. His shirt didn't tuck in well either. I also sewed the black fabric into robes for all four of us.
Got us all dressed with white shirts, plus the ties and robes.
Next was sweet talking Tory into wearing glasses and Arwen into wearing the wig again. The glasses didn't show up well on a black dog, so I took the lenses out and painted the glasses white. Much better!
I added a lightning bolt on Tory's forehead with white chalk and told them to say 'cheese'! And, yes, they smiled! They also got to go to the Halloween party and schmooze everyone for tasty treats.
Tip: Start your shopping at local thrift stores. I bought all the shirts and ties for less than $10. The stores will usually also have lots of ready-made costumes for sale.
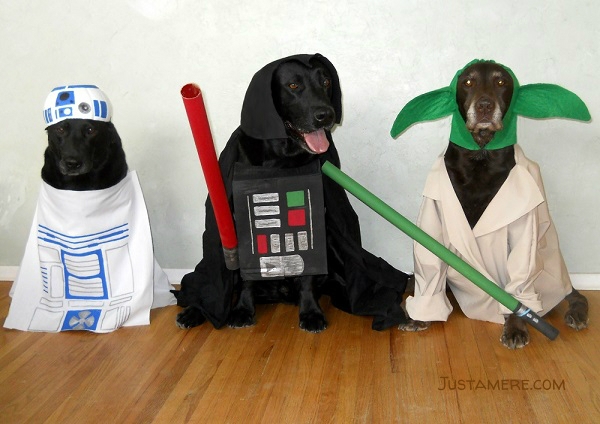
I’d just as soon kiss a wookiee
The next Halloween became an homage to the Star Wars movies, but which three characters should it be? Darth Vader, of course. And when you have bad, you need good.
Should it be Luke, Leia or Yoda? Costume-wise, Luke was boring and I didn't want to try hanging cinnamon rolls on my dog's head, so Yoda was it. And, of course, you need the iconic R2D2.
Next was figuring out which parts of the characters were needed for people to recognize the costumes: Yoda's ears and light saber, Darth's light saber, cape, chest plate and helmet (well, most of it because the mask wouldn't fit) and R2D2's shape and coloring.
Do you have any idea how long it takes to paint a bowl and fabric to look like R2D2? And that was just the start.
Darth's helmet and Yoda's ears both took several fittings, plenty of sewing and LOTS of interfacing to make them stiff enough to look right.
Then more sewing to make Yoda's robe plus painting Darth's chest plate and two light sabres.
Luckily last year's Gryffindor robe worked great for Darth too.
It was worth it though because this was one of the most popular sets of costumes. They were dubbed R2-Dog2, Dog Vader and Yo Dawg.
Supplies:
- a white, plastic bowl
- white fabric
- acrylic paint in white,blue, green, red, silver and black
- a cardboard box about the size of a ream of copy paper
- fabric pieces in black, green and light tan
- fusible interfacing
- two cardboard cores from Christmas wrapping paper
Supplies:
- silver acrylic paint
- black fabric (I repurposed the Gryffindor robes)
- white shirts (I repurposed the shirts too)
- 3 black hats with broad brims
- red satin fabric
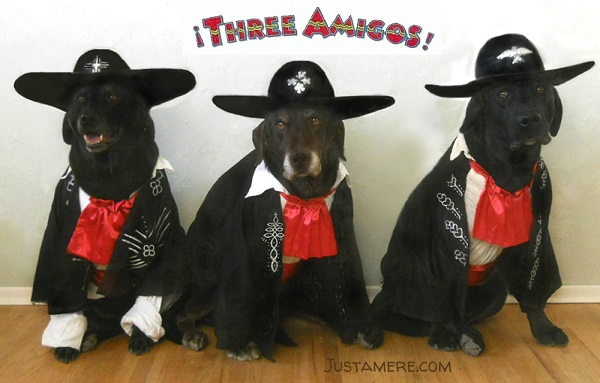
All of us has an El Guapo to face
If you can't tell, I choose characters that are usually a bit over the top to make interesting costumes. So it should be no surprise that Chevy Chase, Martin Short and Steve Martin made an appearance on the next Halloween as the Three Amigos!
With a lot of patience and some silver paint, the Gryffindor robes became sparkly jackets. The white shirts were reused. I also painted the hats. Then a bit of sewing turned the red fabric into ties and cumberbunds.
It's amazing how detailed the real costumes were and I tried hard to replicate the look.
I think Arwen finally liked her costume.
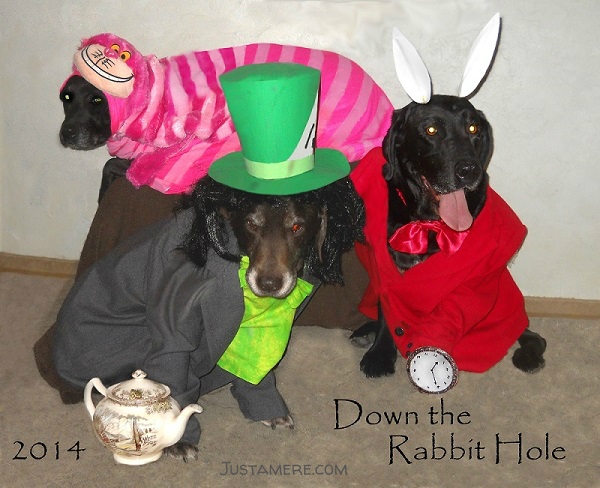
Down the rabbit hole
Liking her costume was short-lived. The next year I put Arwen in a pink Cheshire cat costume and had her lay down on a bench. If looks could kill...
For the hat, I glued green construction paper into a tube shape with the top wider than the bottom. The bottom needed to be about the width of the dog's head. I cut two circles - one for the brim and one for the top. The brim should be about 2-3 inches wider than the bottom of the tube. I cut the top piece a little big and cut off the excess after it was glued to the tube.
To finish the hat, I added some green ribbon around the base of the hat. I made a card with "10/6" written on it and tucked the card in the band. Thin black elastic under his chin kept the hat in place.
Adding a wig, jacket and green tie completed the Mad Hatter's costume.
Making a White Rabbit costume required some creativity. I nixed the idea of painting my black Lab white and instead used features to hint at his identity. I made rabbit ears out of white and black construction paper with light gauge wire glued inside. The wire made the ears bendable and also attached the ears to a plastic headband. Next I repurposed a tie from the Three Amigos costume and added a matching jacket. The white rabbit's large pocket watch was made by painting a whipped topping container lid.
There was a fourth player too, but it wasn't me this year. In the story, there is a Dormouse who pops out of a teapot. I tried James the rat as a stand-in, but he never got his cue right.
Supplies:
- Cheshire cat costume from a yard sale
- 2 jackets repurposed from my closet
- red tie remade from the Three Amigos costumes
- white, black, and green construction paper for the hat and ears
- acrylic paint in white, black, gold
- black Sharpie-type pen
- about 12 inches of 1 inch wide green ribbon for hat band
- thin piece of elastic for the hat
- a small piece of green fabric for the tie
- wig
- about 36 inches of light-gauge wire for rabbit ears
- plastic headband for the ears
- plastic lid from a whipped topping container
- teapot
- hot glue and glue gun
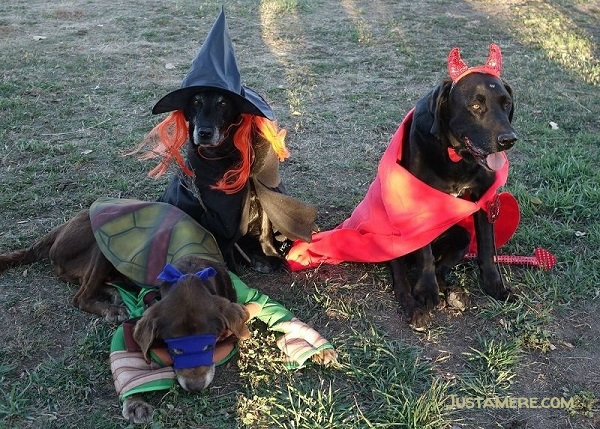
Kids costumes for dogs
By Halloween 2015 we were winding down. Chip was nearly 17 and slept a lot. Tory had been diagnosed with cancer. And I was heart sick. I felt I needed to do one more Halloween photo, but it would have to be simple.
Off to the store again where I found some ready-made costumes - a devil, a witch and a ninja turtle.
I lost Tory just a few days later and Chip in December.
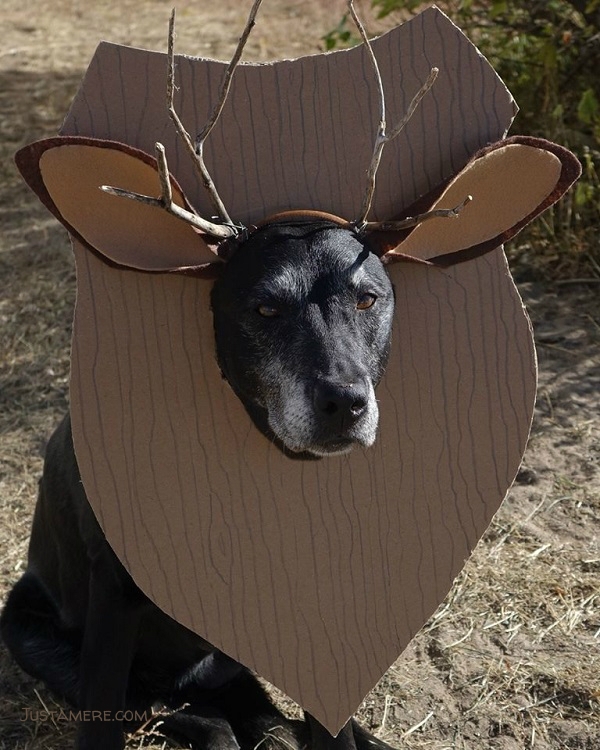
Easy to make deer costume
Although 13 years old, Arwen was still willing so back to the store I went. For her first solo, she was a deer. A trophy deer.
I cut a big piece of cardboard into a shield shape with a hole in the middle just big enough for her head. Then I added some 'wood grain' with a Sharpie.
Next I cut the felt into some oval shapes with the brown felt pieces slightly larger. For a Labrador these pieces were about 8 inches long and 3-4 inches wide. I layered the tan inside the brown felt then rolled and glued one end to make an ear. I repeated the process to make the other ear.
Using some wire, I attached the ears and some twigs to the headband. To introduce her to the cardboard, I let her sniff it and then put it on her head. Note: the cardboard only went over her face. I made the hole small enough so the cardboard would not slip over her ears and down her neck.
With a little persuasion, Arwen sat with this contraption on her head while I took pictures.
Isn't she cute?
Supplies:
- large piece of sturdy cardboard
- Sharpie pen
- brown and tan felt
- girl's plastic headband
- light gauge wire
Supplies:
- small party hats
- thin black elastic
- a friend willing to help
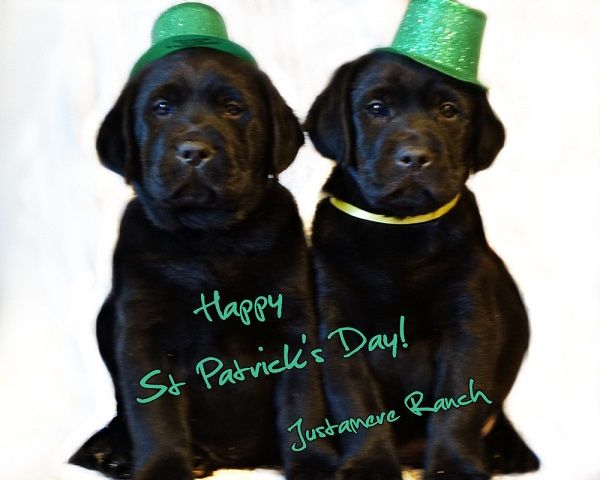
Simple costume for St Paddy's day
After eleven years of Halloween costumes, it was a time of change. More dogs went to the Bridge, but eventually young dogs "volunteered" to carry on the tradition.
In the spring of 2018 I had a litter of puppies who were ready for their 7-week evaluations. A good friend came over, we evaluated puppies, took lots of pictures and decided to give costuming another try.
I already had a bag of small, sparkly green party favor hats. After poking small holes on each side of the hats, I threaded thin black elastic to help hold them on the puppies' heads. Luckily the puppies had run off some energy, but weren't quite ready for a nap. Perfect!
We put two puppies on a table as my friend stood to the side to hold them still. Checking the pictures afterward, we saw the background was just too busy. Bless her heart! She let me throw a white blanket over her head while she stood behind the puppies, keeping one hand on each puppy's hip.
It took a little Photoshopping to blur the background and add a St. Patrick's Day wish, but the final photo was worth the effort!
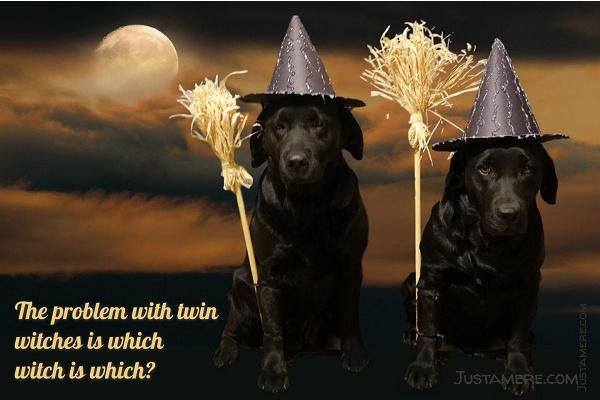
Which witch is which?
In 2019 I was finally ready to try Halloween costumes again. Tisket and Wynk were both obedience trained, so although skeptical, they were willing to sit as I fussed.
For the hats, I rolled some black construction paper into cones with glue to hold it. Then I cut a couple donut shapes for the brims and glued those to the base of the cones. After adding some black elastic to keep the hats in place, they were done. But they were kinda boring. Hmmm. Hot glue gun to the rescue! I added several stripes of glue to the cones and brim to give the hats a little sparkle.
The broomsticks were fairly easy, although a bit messy. I wound raffia into two bundles about 10 inches long and wrapped rubber bands near one end. After sticking the dowels into that end, I cut apart the other end and skrunched until it looked right. To hide the rubber bands, I wrapped some raffia over them and tacked it in place with hot glue.
To solve the problem of no hands to hold the broomsticks, I used more black elastic. I cut two pieces about 8 inches long for each dog. Then tied the ends in a knot that was tight enough to hold the broomstick, but not too tight. I slid them on each dog's leg and slid the broomstick along the leg and under the elastic.
I hoped to take the photos in front of some small trees that had already lost their leaves, but it was too cold and windy. Back inside, I taped a gray sheet on the wall as a background and started taking pictures. But after checking, I decided the background just wasn't right.
Photoshop to the rescue. I removed the background and made it transparent. Checking Pixabay I found a colorful sunset that looked great, added it with a bit of text and my signature. Done!
What do you think of my pretty witches?
Supplies:
- black construction paper
- thin black elastic
- hot glue gun and glue
- 2-1/2 inch dowels
- raffia ribbon
Supplies:
- two stretchy pullover shirts
- yellow and orange tissue paper
- a bag of big pipe cleaners
- a bag of blow up balloons
- lots of duct tape
- several empty soda bottles
- gray spray paint
- about 6 inches of Velcro
- two really cute tutus in sparkly red and purple
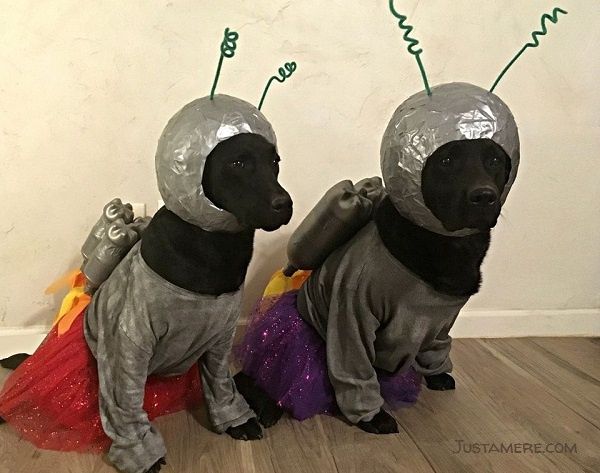
Fun space cadets costumes
I had an idea I wanted to try for Halloween, but it's a good thing I started early.
First task was testing the concept. I blew up a round balloon and covered it with criss-crossing duct tape, leaving a large hole on one side. It took a LOT of tape. When I thought it had enough tape to hold it's shape, I popped the balloon. Nope, it needed more tape.
But before adding more tape, I decided to test fit it. Splash was willing, but thought I was certifiable. I made a few modifications and continued adding tape. I also added pipe cleaner antennas. Then duplicated the process for Sketch's helmet.
Next were the power packs. I had a few plastic soda bottles and painted them silver. While I was at it, I also painted both stretchy shirts. When the bottles were dry, I taped them together. I added Velcro to the bottles and backs of the shirts. Then I added some tissue paper to the ends of the bottles to simulate flames.
Now the test. Would they wear all this stuff AND sit still? Obedience training sure helps, but it was hilarious watching them step on the tutus.
Introducing Space Cadets Sketch and Splash from the Department of Intergalactic Security and Information (DIS-Info.com) ready for service.
By the way, their great grandmama Arwen would be proud!
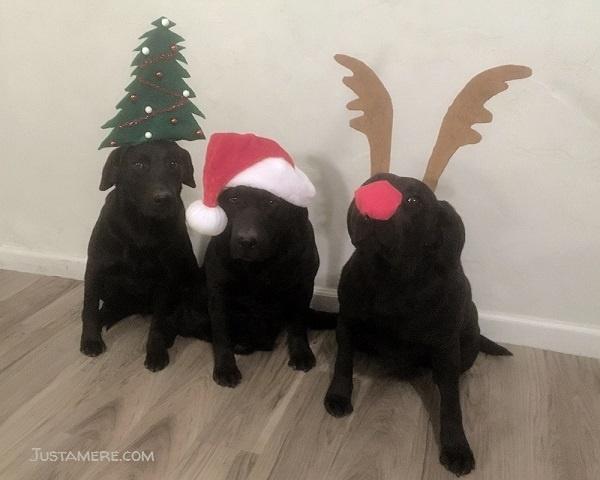
Christmas party costumes
For Christmas 2020, Sketch, Splash and Wynk got their party on!
Starting with the easy outfit, I added a piece of black elastic to the Santa hat to hold it on. After test fitting, I also added a stitch to hold the pompom in the right place.
Next up was Sketch's Christmas tree. I cut two pieces of the green felt into a Christmas tree shape. Using an old clothes hanger, I cut and shaped it into an upside down V shape. With the hanger ends sticking out of the bottom about an inch, I hot glued the hanger to the felt. I bent the ends and left them long for support at the back of the tree. Then I glued the front and back together and to the hanger. I added some small decorations. It did take a bit of tweaking to keep the tree from falling over.
Splash's antlers were made similarly to the tree. I made the red nose from a circle of red felt stuffed with cotton balls. It weighed nothing, but Splash thought she should hold it in her mouth instead of balancing it on her nose. Tiny black elastic to the rescue.
Supplies:
- Santa hat
- green, tan and red felt
- 2 plastic headbands
- tiny Christmas decorations
- glue gun and glue sticks
- thin black elastic
- a couple of old wire hangers
Supplies:
- 3 red, white and blue bandanas
- 3 decorative headbands
- fireworks sticker
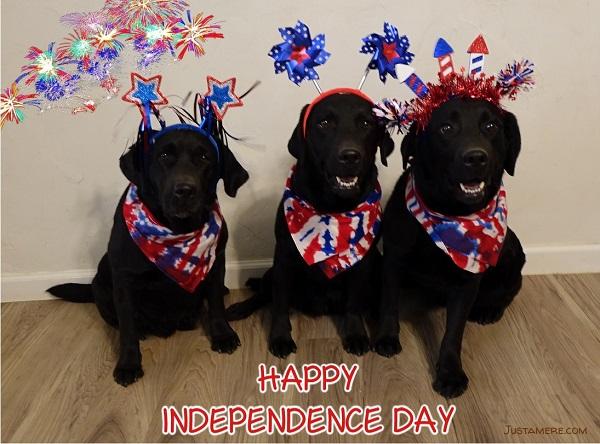
Super simple costumes for July 4th
Costumes for Independence Day celebrations were a snap! Bandanas, decorated headbands and a small fireworks sticker for the wall was all it took.
Wynk, Sketch and Splash really got in the spirit this time!
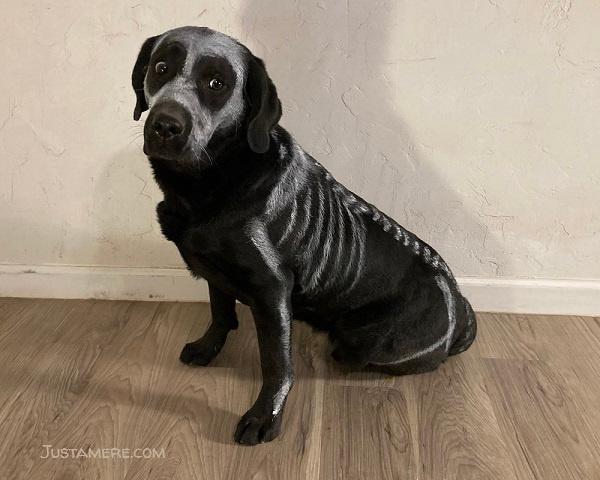
Inexpensive skeleton for Halloween
This Halloween was supposed to be two canine skeletons. Alas, there was only time enough for one.
I tried white chalk, but it didn't cover well enough on a black dog. Instead I used nearly a bottle of white acrylic paint. It took quite awhile to paint and Splash needed several breaks. She was carefully supervised so she didn't spread the paint around the house.
Even a first year veterinary student would probably laugh at the bone placement, but I think she turned out cute. Especially when Splash thought she saw a "ghost" popping out from behind the couch.
Splash got to model her costume for another day, then needed a bath to look like herself again.
Tip: Try colored chalk or paint if your dog isn't black.
Supplies:
- white chalk or acrylic (washable) paint
- dog skeleton image for reference
Supplies:
- blue acrylic paint
- skein of brown yarn
- 2 small strings of craft beads
- red bandana
- pieces of fabric on sale
- toy sword
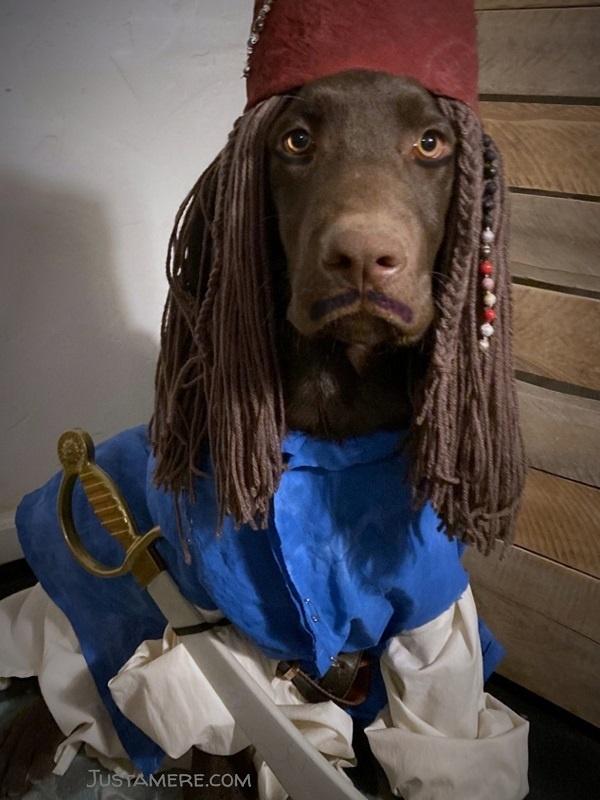
Drink up me hearties, yo ho!
Halloween 2022 brought a new player to the lineup. This is 5-month old Boo, a chocolate Lab. I think he was born for the limelight!
To prepare, I looked through many images to help me decide what to get to capture the essence of Cap'n Jack Sparrow.
After loading up on supplies, the first task was cutting and gluing the fabric into a vest shape. It needed a color boost and a bit of blue craft paint worked just fine.
Next was cutting yarn into 24 inch pieces, folding them in half and gluing together into clumps. I also braided a couple pieces of yarn.
In the movies, Cap'n Jack often wears a dirty red bandana around his head. However the difference in anatomy between people and dogs presented a bit of a problem. To solve it, I first tied the bandana like it was on a person's head. Next I glued all the yarn clumps, plus the braid and a string of beads to the inside of the bandana. I also added a string of beads to the top of the bandana.
It wound up looking like a fez, but at least the whole shebang didn't need elastic to stay put. I should mention it got mouthed a bit, but I think that added to the authenticity.
Next we had some rehearsals.
Wear the hat and wig while sitting? Check.
Wear the blue vest and a white shirt while sitting? Check.
Wear all of it plus the sword while sitting? Check.
Added a smudge of mascara under his eyes and on his lip. AND WE ARE READY!
Boo did a great job as the dashing, yet goofy, Cap'n Jack.
My what big teeth you have!
Boo is back; this time with momma Wynk.
I started her costume by cutting a hole big enough for her head in the closed end of the pillow case. Then I folded the corners over and tacked them down to make the shoulders look more realistic. (Note: I realized later this wasn't necessary as they were covered by the cape.)
Next I pulled the pillow case over her head and marked where I needed holes for her front legs. I started small when cutting the holes and gradually made them bigger. A tape measure might have helped, but this way seemed easier for me.
Then I cut two rectangles out of the black fabric - about 9 inches wide and 15 inches long. They needed to be long enough to cover from her shoulders to her waist. And wide enough to cover from the edge of her chest and around her side. I decided not to take it all the way around her back as that would be covered by the cape.
I also cut four pieces of black fabric about 1/2 inch by 12 inches to criss cross her chest. Black ribbon would also work.
Placing the black rectangles on the front of the pillow case, I left about 7 inches open in the middle. I attached the criss crosses in the middle and the black rectangles on the sides, using the glue gun.
Turning it inside out, I cut the black fabric where it overlapped the leg holes. Time to test fit!
Next up was making the red skirt. I cut the red fabric at 22 inches long and glued the selvages together. Then I turned over about an inch at the top and glued the edge to make a tube. After measuring around her waist, I cut some elastic about 2 inches shorter. I slid the elastic through the tube, pulled it snug and tied it in a knot.
For the cape, I cut the fabric about 40 inches long. After folding it in half, selvage to selvage, I laid it out on the table. I drew a shallow curve along the top edge using some chalk. Next I cut and glued together the cut edges.
For the ribbon, I cut the leftover fabric about 1.5 inches wide and selvage to selvage. I wrapped this around Wynk's neck and tied a bow to hold the cape on.
Boo's costume was much easier. First a quick trip to a thrift store for an old-fashioned nightgown and reading glasses. Then I cut about 8 inches off the bottom of the nightgown and slip-stitched the cut edge. I carefully pulled the thread to make a floppy night cap.
As dusk was descending, I took Wynk and Boo out to the edge of the woods. I dressed Wynk first and fluffed up the cape and skirt. Boo's costume was simple and quick. Snapped a few photos and done!
What costume(s) should we try next year? Use the contact form to let me know your ideas.
Note: Because these costumes probably wouldn't be used again, I cut corners. I glued seams instead of stitching and left raw edges instead of hemming.
Supplies:
- old, white pillowcase
- black fabric remnant
- 2 yards red fabric
- 24 inches white lace, approximately 2 inches wide
- thread
- thrift store nightgown
- eye glasses
- glue gun and glue
This post was originally published on October 31, 2019. Edited and updated with new content on April 9, 2024.
© 2024 Justamere Ranch Labradors All rights reserved.
Do not copy photos and content without written permission.
Website by: Exede Digital


![]()
![]()